Happy Sunday, crafters! I’m excited to share two Clean and Simple (CAS) cards with you today. This idea has been floating around in my mind for a while, and I finally had the chance to bring it to life this morning. I hope you enjoy these creations as much as I enjoyed making them!
With the holiday season quickly approaching, having a few thank you cards in the stash is always a good idea.
If you’re looking to recreate this card, here’s what you’ll need:
Happy November, crafters! Say hello to Walter! He sits on top of a coffee cup, bringing the joy of a gift card to someone this year.
For this festive card, I combined Tim Holtz and Lawn Fawn. I thought they married fairly well for this card. What do you think? Can you find my obvious mistake? Let me know below.
If you’re looking to recreate this card, here’s what you’ll need:
Paper: Carta Bella A Vey Merry Christmas (unfortunately discontinued); black,white,yellow,craft cardstock from the stash
Distress Oxide: Ground Expresso
Tim Holtz Sizzix: Walter-December 2023, Twig & Stump, Collector
Tim Holtz Sizzix, Switchlit Seal
Lawn Fawn: Stitched Circle Die, Stitched Rectangle frame, Coffee Cup Gift Holder
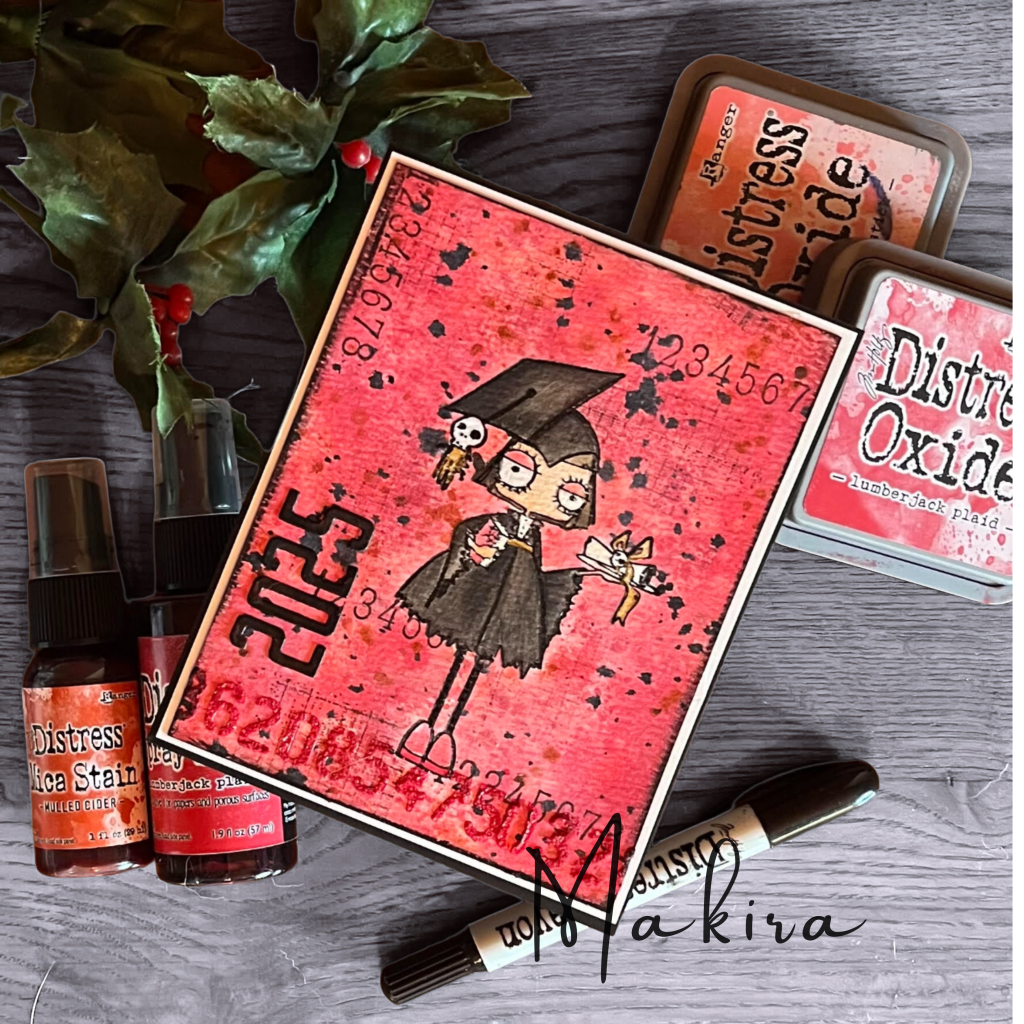
My color scheme inspiration is drawn from the striking black and red pattern on the inspiration board. The theme itself is rooted in the Wizarding World of Harry Potter, highlighting the essential role of education within that enchanting story.
This card is designed for a graduating senior who will be starting her engineering studies this fall. To celebrate her academic journey, I thought it would be fun to incorporate graph paper and numerical elements into the background, symbolizing engineering. I’ve also incorporated her university’s colors—red, black, and white—adding a touch of school spirit.
If red isn’t your color of choice, consider joining us with dark burgundy or pink, as they are lovely shades of the primary color red. If that still doesn’t inspire you, feel free to create a rainbow-themed entry instead!If the theme of snow doesn’t spark your creativity, feel free to explore another theme from a theme park that inspires you. Clearly, I found my inspiration this month from another source! 🧙♂️❤️📚⚡️
Make sure you join in on the blog or on Instagram for your chance to win a gift certificate of your choice (Simon Says Stamp, Scrapbook.com, or Amazon). Visit the challenges to check out the amazing creations from the talented Design Teams. You can’t win without entering! Come join the fun!!
For the Colorful Options Challenge, you have until Thursday, November 28th, 11:59pm US CST time, which translates to 5:59am on Friday, November 29th in the UK or 6:59am on Friday, November 29th in CET.
For the Park Hopping My Happy Place, you have until Saturday, November 30th, 11:59pm US CST time, which translates to 5:59am on Sunday, December 1st in the UK or 6:59am on Sunday, December 1st in CET.
If you’re looking to recreate this card, here’s what you’ll need:
Azteca Watercolor Paper, black & white cardstock from the stash
My card takes it’s primary inspiration from the colors of the inspiration board this month. The theme itself is postcards/mail inspired by Owl Post in Hogsmeade at the Wizarding World of Harry Potter.
If the theme of snow doesn’t ignite your creativity, don’t hesitate to draw inspiration from another theme that resonates with you from a theme park.
Make sure you join in on the blog or on Instagram for your chance to win a gift certificate of your choice (Simon Says Stamp, Scrapbook.com, or Amazon). Visit the challenge to check out the amazing creations from the talented Design Team. You can’t win without entering! Come join the fun!!
For the Park Hopping My Happy Place, you have until Saturday, November 30th, 11:59pm US CST time, which translates to 5:59am on Sunday, December 1st in the UK or 6:59am on Sunday, December 1st in CET.
If you’re looking to recreate this card, here’s what you’ll need:
Tim Holtz Stampersanonymous: Paint by Number CMS483, Grunged CMS402, Stamptember 2024
Sizzix dies: Festive Boquet, Wildflower Stems
Make sure you join in on the blog or on Instagram for your chance to win a gift certificate of your choice (Simon Says Stamp, Scrapbook.com, or Amazon). Visit the challenge to check out the amazing creations from the talented Design Team. You can’t win without entering! Come join the fun!!
For the Colorful Options Challenge, you have until Thursday, November 28th, 11:59pm US CST time, which translates to 5:59am on Friday, November 29th in the UK or 6:59am on Friday, November 29th in CET.
Wishing all the entrants good luck! Have fun, everyone!
This card was inspired by Christmas, snow, and fairies. I was inspired by Marta at Maremi Small Art to make this card.
If the theme of snow doesn’t ignite your creativity, don’t hesitate to draw inspiration from another theme that resonates with you from a theme park.
Make sure you join in on the blog or on Instagram for your chance to win a gift certificate of your choice (Simon Says Stamp, Scrapbook.com, or Amazon). Visit the challenge to check out the amazing creations from the talented Design Team. You can’t win without entering! Come join the fun!!
For the Park Hopping My Happy Place, you have until Saturday, November 30th, 11:59pm US CST time, which translates to 5:59am on Sunday, December 1st in the UK or 6:59am on Sunday, December 1st in CET.
If you’re looking to recreate this card, here’s what you’ll need:
Hello crafters, I’m back with another fun, square-shaped card! It seems like my creative mojo has taken a square turn—sometimes, that’s just how inspiration strikes!
Lately, I’ve been diving into the world of collage art, following some incredible artists on YouTube. Honestly, I find this technique quite challenging; it often ends up looking like something I made in kindergarten! 😂
So, when Mr. Wheel picked collage as yesterday’s project, I was thrilled to embrace the challenge. For this card, I drew inspiration from a beautiful journal page by MaremiSmallArt. Let’s get crafting!
Here is a list of the products I used if you want to also try your had at collage:
Azteca watercolor paper, paper from the stash: green
Distress Oxide Paint: Lumberjack Red, Mowed lawn, Lost Shadow
White & clear Gesso
Liquitex Soft Body Acrylic: Unbleached Titanium, Titanium White, Ivory Black
Distress Collage Medium
Disstress Oxide Archival in Rustic Wilderness
Washi Tape: TH, red&white from the stash
Tim Holtz Sticker Book: Postmarked
Stampers Anonymous, Tim Holtz: Tiny Text Christmas CMS 424, Grunged CMS402
Tim Holtz Ideology Collage Paper: Christmas/Noel
Feel free to follow along with Maremi in the link above, or read on for my description.
Prepare Your Base: Cut a watercolor panel to a 4.5-inch square.
Create Your Collage: Tear the notes page and Ginger Toffee descriptions to your desired size, then glue them onto the panel using collage medium.
Add Decorative Elements: Layer on pieces of washi tape and stamps or stickers as you like.
Highlight the Poinsettia: Tear the collage paper to isolate the poinsettia, then adhere it with collage medium. Allow everything to dry completely.
Blend Your Colors: Start blending your background using Unbleached White, Titanium White, Lost Shadow, and Mowed Lawn paints. Let this layer dry.
Enhance the Poinsettia Leaves: Use Lumberjack Red, Ivory Black, and Mowed Lawn paints to enhance the leaves of the poinsettia.
Add Some Texture: Once the paint is dry, create a splatter effect with white paint and allow it to dry again.
Finish with Details: Using archival ink and a round stamp, add some details and stamp your sentiment.
Layer Your Card: Finally, ink the edges of your card, center your sentiment, and assemble the layers.
Craft Roulette (Collage=fairly obvious; Italian Restaurant=Italy’s flag; Short=tiny,Tiny Text; Diagonal Lines=paper torn on the diagonal for the background)
I had the chance to spend some time in my craft room this morning. Here is what I created.
I can’t say they are CAS; but, they were simple to make. Start by selecting an oxide ink for your base and gently smoosh it onto watercolor paper. Next, position your stencil and stamp the sentiment through it. Once that’s done, outline the stencil design with black ink for added definition. Use a coordinating watercolor pencil to add shading to the stencil, then apply Distress Sparkly Paste over the entire area for a shimmering effect. After everything has dried, emboss the sentiment using black embossing powder. For added interest, apply opaque black paste through a second stencil. Finish off your project by tying a bow around the bottom and framing it with coordinating cardstock from your stash.
Here is a list of the products I used if you want to CASE these:
Azteca watercolor paper, paper from the stash: purple, black,pink
Craft Roulette (small bag-used to help smoosh the ink & inside a small bag provides space for a gift card; CAS-I cased my own card and it’s square size; Cornicopia-pink & purple; Splatters-yes, ink of course)
This card was fairly simple to make. Start with some watercolor paper and ink stamp with a stencil of your choice. Use coordinating papers for the panel to the right and background. Emboss a simple sentiment using some of the coordinating paper as a border. Stitch the panels to the background and place them on a card base of your choice.
If you want to create this card, here is what I used: