Happy May, crafters, and makers! I have an exciting and different craft to share today. I designed and made a Sweet Lolita Style dress. For those that don’t know Lolita fashion, it is a Japanese street style of dressing that has an aesthetic of cuteness. Wikipedia has a good description of this style if you would like to know more. I worked without a pattern and followed the classic Lolita style. I made some of the coordinates and purchased others.
Fabric: pink gingham (about 6 yards-from my stash)
Elastic: 2 inch (3yards)
Thread: white sewing thread
Time to make – 20 hours
Although this was not made with the intent of displaying a “pink” craft for this month’s Colorful Options Challenge, it certainly is a craft that screams pink.
Check out this month’s challenge for more DT inspiration!
Thanks for stopping by! Have a great month and happy creating!!
Happy May, crafters! There is another challenge over at the Colorful Options Challenge this month. And as you might have guessed, the featured color this month is PINK! This is definitely an inky card, so get out your splat box and have some fun. The supplies are all listed below.
Add Kitsch Flamingo Distressed Oxide on the flat side of the embossing folder. Lightly mist the white cardstock and emboss it with an embossing folder. Color the tree and bird using a water brush and Distress Oxide Inks “smooshed” onto a working surface. Spray with water to blend into the background color. Repeat the painting and water blending as needed until happy with the result. Allow to air dry or dry with a heating tool. Use the Archival ink and Ledger script stamp to stamp randomly on the background. Blend Old Paper and Frayed Burlap together with some water and apply to the border; then, use a foam blending tool and apply Old Paper over this to blend out. Use water to help blend until happy with the result. Splatter with Foundry Wax and heat set. Create the sentiment using Lawn Fawn’s alphabet, Versamark Ink, Gold embossing powder, and some vellum. Cut out a pink rectangle using Cricut. Glue the image to the pink rectangle frame. Mount this on white fun foam and add to a second border cut about two millimeters larger than the pink rectangle. Place on the card front.
Don’t forget to visit this month’s challenge for more DT inspiration!
Happy Weekend, Crafters! I have a little envelope art to share on this beautiful Saturday. A very pink creation! This was fun and fast to make. Enjoy!!
Cut your paper down to envelope size (9.5inx9.5in – for a 5×7 card), score, and cut notches with the envelope board. Stamp the flowers in Versamark ink and emboss them in white powder. Make a spray using the Colorshift Orchid and water. Get out your splat box and spray with a small amount of water, Distress Oxide sprays, and the color shift spray until you are happy with the color. Heat dry or air dry. Add some blue accents with some Blue color shift acrylic thinned with water. Splatter with blue color shift and Tarnished Brass. Allow a second drying time. Flip over and paint the inside of the envelope with the gold acrylic paint. Use the excess paint on your finger to apply to the edges of the envelope until happy with the result. Allow, yet another dry time. Fold and glue.
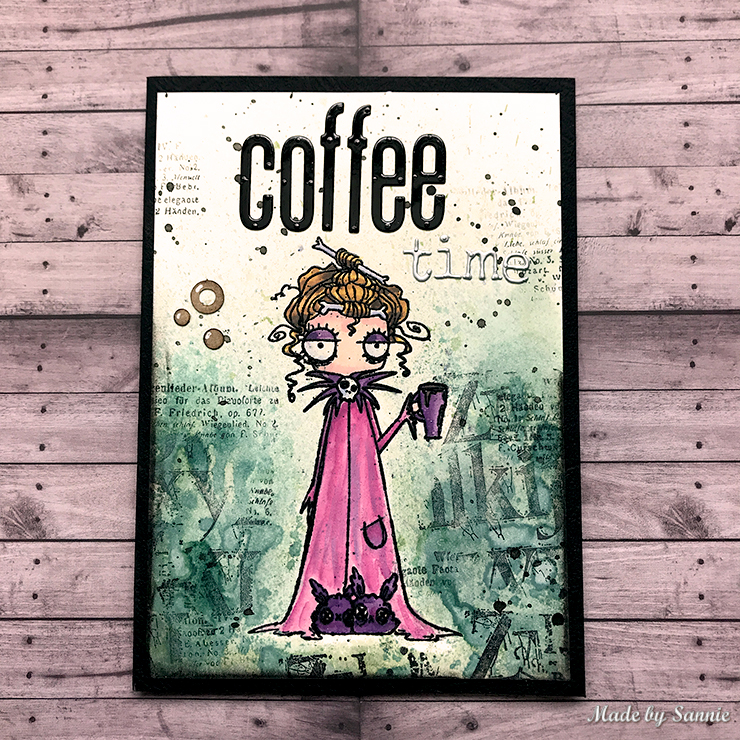
Happy Hump Day, Crafters!!! I finally had some time to create. I saw a video Made by Sannie, and just had to try her techniques. OMgoodness it was tremendous fun!
Supplies:
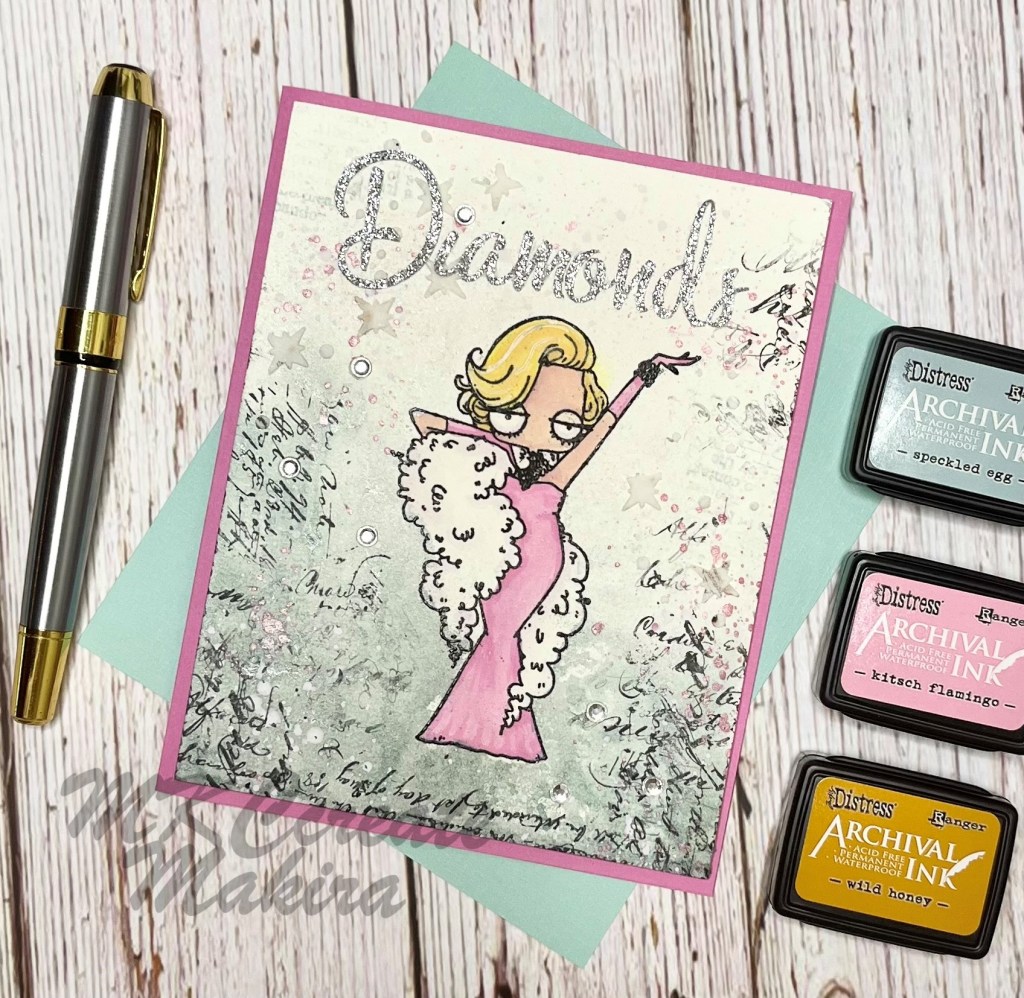
Papers: Arteza Watercolor Paper, Fuschia card stock, Silver glitter card stock, white fun foam
Stamps: Stamping Bella’s Oddball Marilyn, Tim Holt’s Ledger Script CMS241, SSS Good Reading Background
Embossing Powder: Emerald Creek’s Black Cherry Aroma
Guache: White
Texture Paste: Distress Matte with Distress Frosted Crystal
Distress Micro Glaze
Embellishments: “Diamonds” from the stash, White Gel Pen
Stamping Platform: Mini Misti
Time to make – 2 days, Craft time – 3.0 hours.
Directions:
Stamp Marilyn in Archival Ink twice and then with Versamark. Emboss with Black Cherry powder. Color using a water brush and Distress Oxide Ink “smooshed” onto a working surface. Allow to dry and place micro glaze over Marilyn. Spray with water and the Distress Ink sprays until you are happy with the color. Heat dry or air dry. Splatter with Picked Raspberry and white gouache. Add the texture paste through the stencil and allow it to air dry. Randomly stamp with Archival Speckled Egg using SSS’s Good Reading stamp. Randomly stamp with Archival Black Soot using Tim Holt’s Ledger Script CMS24. Add sentiment and jewels. Mount to white fun foam and add to the card front.
Here is a copy of the inspiration card:
Go check her video for detailed instructions on how to make a card like this!
Happy April, crafters! It’s been a crazy month down South. I can’t believe I barely posted last month….. I hate it when life gets in the way of my hobbies. 🤣 Back to crafting!
There is another challenge over at the Colorful Options Challenge this month. And as you might have guessed, the featured color this month is YELLOW!
Water Color: Kuretake Gansai Tambi Starry colors 6 color set
Stamping Platform: Mini Misti
Craft time: 1.5 hours
Directions:
Tape off a border to the white background base. Ink blend with Distress Oxide and Hero Arts Butter Bar until happy. Splatter with watercolor gold and yellow ink. On the second piece of white cardstock, stamp using Ink on 3 Disappearing Ink and a stamping platform. Then ink blend using the coordinating stencils. (You could also color with watercolor, Copics, pencils – whatever you have on hand). Once colored, use the coordinating die to cut out the flowers. Place the “frame” from your cutout and the flowers back into your stamping platform and stamp the flowers a second time with Versamark Ink. Emboss using Yellow Tinsel. Cut out and ink your butterfly and sentiment. Stamp the sentiments with Versamark Ink and emboss using coordinating powders. Strategically place the flowers and butterfly around your background until you are happy. Mount to coordinating papers for a framed appearance.
Don’t forget to visit this month’s challenge for more DT inspiration!
OMG! I was so excited to see this on Cricut this morning, I just had to share. They have Chibi Harry Potter. There are 67 images that are SVG cut files. I can see adorable cards coming in the future! Had to share!
Is everyone ready for some green beer on the 17th??? This little gnome is!
My gnome comes from Cricut access and then inked with corresponding Distress Oxide colors. Versamark ink and puff embossing powder was used for the beer foam. His background is a combination of Distress Inks (Speckled Egg, Squeezed Lemonade, Rustic Wilderness). A little stitching was added for some interest. After which, some horseshoes and clovers were added with a Makira-made stencil and translucent DO grit paste; Green was added with Rustic Wilderness distress crayon. Gold splatter was added with gold watercolor and Rubin Buff gold leaf. The sentiment and clovers were cut out of some green cardstock. Gold leaf was added to the sentiment as well. Add a green and yellow frame and you are ready to celebrate.
“A poisoned apple! Ho-ho-ho-ho-ho! One taste of the Poisoned Apple, and the victim’s eyes will close forever in the Sleeping Death. Dip the apple in the brew. Let the Sleeping Death seep through.” – Evil Queen
The recipe, you desire? You sure? Hopefully no draught of living death here:
Spray the Red Warm Tim Holtz Cardstock with a very liberal layer of Candied Apple Red Distressed Ink and allow to dry. The dry time is many hours ( think 6+), however, it will dry. Print the Digi image from The Graphics Fairy on craft card stock. Apply Distressed crayon in Bubling Cauldron using the stencil over the printed Digi image to achieve the background. Use the Time Holtz Green Cold Cardstock in combination with his Poison embossing folder to add a second layer. Then use a mixture of Candied Apple Red and Aged Mahogany on the embossed paper to give it a slight red tint. By now the red cardstock should be dry, using the Cricut and SVG files, cut it out along with the lime green to form the apple. The SVG is available through Cricut. Liberally apply Peeled Paint Distressed Ink and Bubling Cauldron Distress Mica Spray to the lime green cut cardstock. While still wet, add the hot glue to the edges to form the ooze. Immediately after adding the glue, with the ink still somewhat wet, use your embossing gun or heat tool to melt the glue; this will help incorporate the ink into the glue to give it the green ooze look. Type your sentiment and cut it to size with a paper trimmer. Use Aged Mahogony Distress Oxide Ink to ink the sides of your sentiment. Last, just some glue to put the layers together.
This card will be sent for Halloween, my favorite occasion. Why is it my favorite, I love the freedom to dress in costume and just have fun for the day.
This cute little fairy home was brought to life by Eden. As Lawn Fawn products are her favorite stamps, she chose Fairy Friends and Frosty Fairy Friends to create her scene. The images were stamped with Ink on 3 disappearing ink and then colored with a varitey of Prismacolored pencils. The tree and bushes were painted using Distressed Oxide Rustic Wilderness paint and decorative moss as her sponge. Why moss…. why not? She thought that the the moss would create the mossy forest effect she had envisioned.
This is Eden’s contribution to the Colorful options Challenge. It’s time for another month and another color challenge at the Colorful Options Challenge. This month, can you guess? The color is GREEN!
To check out the challenge, just click on the photo above or below. Our color this month is green… ANY green. Remember, the color does NOT need to be monochromatic; just the primary color needs to be a shade of green. If you do not like green, a card with a rainbow of colors is also welcome. Hope to see everyone’s makes soon! Cheers! Eden