Trick or Treat

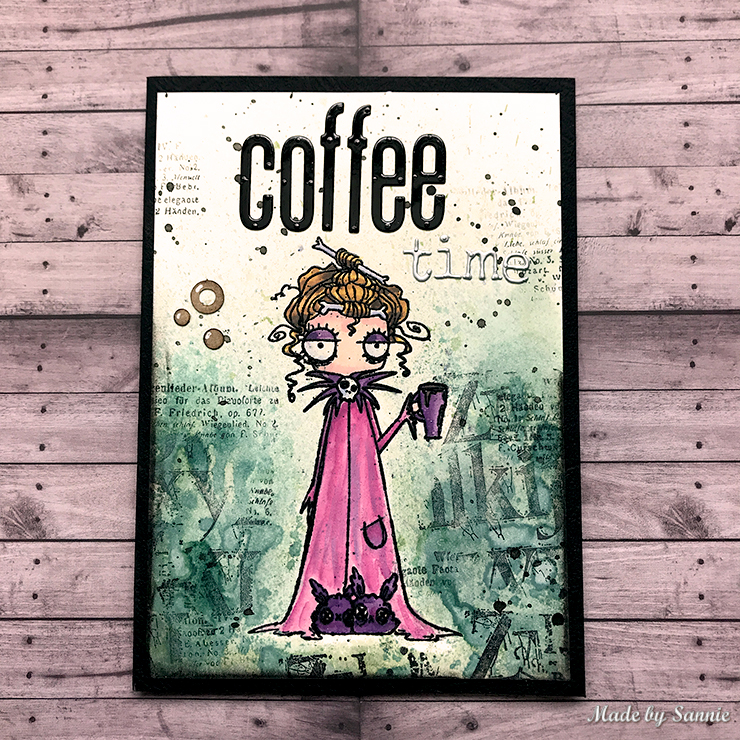
TFIF, makers!!! I have a Halloween card for this Friday the 13th! I thought it was fitting for today. This is a fully furnished Tim Holtz card. The only non-Ranger/Holtz products used were the gel pens and the pan pastels. Have a Happy 13th!

Supplies:

  • Papers:  Azetca watercolor paper, Parklane grey and black 80lb cardstock
  • Stamps: Tim Holtz Halloween Cut Outs,
  • Stencils: Tim Holtz Typo Layering, Moon Mask
  • Inks: Distressed Oxide Ink (Saltwater Taffy, Hickory Smoke); Distress Ink (Black Soot), Archival Ink (Black Soot and Hickory Smoke), Black Soot Ink – re-inker, Distress Oxide (Black Soot, Saltwater Taffy, Antique Linen)
  • Distress Crayon: Black Soot
  • Texture Paste: Crypt
  • Distress Mica Spray:
  • Perfect Pearls: Perfect Copper, Interference Red
  • Distress Oxide Foundry Wax: Statue
  • Distress Oxide Paint: Saltwater Taffy, Speckled Egg, Black Soot
  • Embellishment: Gel pens and pan pastel (Burnt Sienna Tint, Pthalo Blue Ex. Dark)
  • Stamping Platform: Mini Misti

Directions:

Get out the spat box and let’s begin. Place your moon mask on the paper with some tape. Lightly mist the Arteza watercolor paper and spray with Saltwater Taffy, Hickory Smoke, and Black Soot until happy with the result. Sprinkle the perfect pearls on when the paper is still wet but not soaking. Lightly mist with water if desired for the pearls to blend more. Remove the moon mask and mist with water to allow the wicking of some of the ink onto the moon. Allow to air dry or dry with a heating tool. Use the other moon mask and ink with Distressed Oxides until you are happy. Sprinkle with Saltwater taffy Distress oxide and Foundry wax. Emboss the foundry wax. Stamp the images with Archival black ink. I used the patterned side of the watercolor paper and used a small paintbrush with Black Soot reinker ink to fill in the images for a solid result. Mix the texture paste with the paint until happy with the color. Use the typo layering stencil to add the colored texture paste. With the texture paste wet. spinkle with Perfect Pearls and tap off the excess. Allow to dry. Using a small word stamp and Hickory Smoke Archival ink, randomly stamp background. Add Crayon the bottom of the image and Black Soot Oxide to the edges. Use the pan pastels to add a little more glow to the moon and dark haze to the background. Mount image to cardstocks and base. Final card is 6.5″x4.75″.

Hope you enjoy!

Challenges entered: Two Old Bats Halloween Challenge, A Perfect Time to Craft Challenge

Thank you for your support, Tim Holtz Addicts!!

Butterfly Dreams

Happy Mother’s Day, Crafters!!! I was inspired by multiple different sources for this card. It started with the Fusion Challenge, then I loved the work by Cherion and Zoey from Tim Holtz’s 2021 Prize Ribbon release. So many options and I amalgamated everything into this card. Here’s everything I used.

Supplies:

  • Papers: Stonehenge Aqua Coldpres Black 140lb water color paper; Azetca watercolor paper, Fabriano Black Black 140lb cardstock, Parklane turquoise 80lb cardstock
  • Stamps: Tim Holtz Tiny Text CMS394
  • Embossing Folder: Tim Holtz Alterations Leafy
  • Inks: Distressed Oxide Ink (Prize Ribbon, Tumbled Glass, Salvaged Patina); Distress Ink (Salvaged Patina, Prize Ribbon), Versamark Embossing Ink,
  • Embossing Powder: Nuvo Cool Jade
  • Distress Mica Spray: Snowflake, Frosted Juniper, Brushed Pewter
  • Perfect Pearls: Forever Blue
  • Sizzix Impresslit: butterfly (#665251)
  • Fun Foam: black
  • Stamping Platform: Mini Misti

Time to make – 2 hours

Directions:

Add Salvaged Patina, Prize Ribbon and Tumbled Glass Distressed Oxide on the flat side of the embossing folder. Lightly mist the Arteza watercolor paper and emboss it with the embossing folder. Get out the splat box and spray with additional Prize Ribbon, Tumbled Glass and Salvaged Patina until happy with the result. Mist with Brushed Pewter. Allow to air dry or dry with a heating tool. Cut out 4 butterflies using the thinlit and black watercolor paper. Using a paint brush and a combination of perfect pearls, Distressed Oxide and Distress Ink reinkers, and mica sprays apply to the butterflies until you are happy. Create the sentiment using Tim Holtz’s sentiment, Versamark Ink, cool jade powder, and some scrap black paper. Mount the background on black fun foam and add to the black border about two millimeters larger. Create a second turquoise frame. Mount everything on a black card base. Final card is 6″x4.5″.

Hope you enjoy!

Challenges entered: Fusion card challenge, Can You Handle the Pressure?, Scrapping4FunChallenges, Pearly Sparkles Challenge, Critter Crazy Challenge

May The 4th Be With You – 2022

May the 4th be with you, crafters! A fun and a whimsical card with a matching envelope here to celebrate the unofficial Star Wars Day! For those that don’t recognize this trooper, it is Captain Vill from the Clone Wars. The envelope is a “generic” stormtrooper and the sentiments are my own creations. Most of this card and envelope set is digital with a little acrylic paint.

This may be the card you are looking for. ENJOY!

Challenges entered: The Fairy and Unicorn Challenge (slightly different fantasy 🤪), Scrapping4Fun Challenge, SSS Monday Challenge,

Love Potion #9

Happy May, crafters! This morning, a young Madame Ruth is off to sell her love potion to anyone who dares. She is selling her wares in a magical and rustic setting this year. Care to “hold your nose, close your eyes and take a drink”? For those so brave, or foolish, the recipe follows…….

Ingredients:

  • Papers: Nina Solar White 100lb paper, Arteza Watercolor Paper, Pink Card Stock
  • Foam: White fun foam
  • Stamp: Stamping Bella Love potionOddball
  • Copic markers: E11, E21, E57, E59, RV63, RV85, RV06
  • Stencil: Hero Arts “Into the Woods”
  • Texture Paste: Distress Texture Paste Translucent
  • Distress Embossing Glaze: Kitsch Flamingo, Villanous Potion, Antique Linen, Cracked Pistachio, Hickory Smoke, Wilted Violet, Walnut Stain
  • Inks: Distressed Ink Kitsch Flamingo, Salt Water Taffy
  • Glitter: Distress-Clear Rock Candy
  • Spectrum Noir Clear Glitter Pen
  • Ink: Memento Black Ink
  • Stamping Platform: Mini Misti

Prep Time: 20 minutes Craft Time: 1 day-ish Yield: 1 card

Directions:

Apply texture paste through the stencil on the watercolor paper. While still wet, sprinkle the embossing glazes and glitter over the texture paste. Finger tap the bottom to cover all of the paste and then “dump” the extra glaze/glitter. (Tim Holtz video link for technique) Allow to dry. The dry time is many hours ( think 6+), however, it will dry. Emboss with an embossing gun. Spray the watercolor paper with a little water and add Kitsch Flamingo and Salt Water Taffy ink to the paper until you achieve the desired result. Again, allow drying. Stamp your image on Nina cardstock with Memento ink and color with Copics. A Scan N Cut was used to cut out the image. Add Glitter to the image as desired with the Spectrum Noir Pen. Mount the background to fun foam; I prefer this as the paper is always a little warped and I get a better result with a layer of foam cut just short of the paper dimensions. And last, just glue your layers together.

Young Madame Ruth was created for this month’s challenge at the Colorful Options Challenge. Of course, this month’s color is PINK!

Don’t forget to visit this month’s challenge for more DT inspiration! Happy Crafting!

Inspiration card: Colorful Options Challenge

Challenges entered: Double Trouble Paper Crafting Challenge #109

Marie

Happy May, crafters, and makers! I have an exciting and different craft to share today. I made this rosette pin for DD16 to match an outfit she was sewing. It has a simple-clean appearance and is a fabulous accessory!

Supplies:

  • Ribbon: 1/2 inch pink satin ribbon, 1-inch white lace ribbon, 1/2 inch Fuschia ribbon.
  • Beads: 4mm white pearls
  • Thread: white sewing thread, white beading thread
  • 1.25 inch button
  • Cricut Air2
  • Paper: white copy paper
  • Charm: silver cat

Time to make – 2 hours

Directions:

Upload the digital Marie image into Cricut. Place her in the middle of a 1.25 inch white circle and then attach and flatten. Print and cut your “Marie”-circle. Make a button using a button maker and remove the back pin if needed. With the 0.5inch pink satin ribbon, make a rosette. Glue your button to the middle of your rosette and glue a paper backing the back of the rosette. Cut and glue the tails from the lace and pink ribbon to the back. Add a second paper backing to the rosette. String the pearls as needed to create a circle around the button. Then glue your string pearls around the button. Create a small pink bow using pink ribbon scraps and add the cat charm to the bottom of the bow. Glue your bow to the bottom of the button. Add a pink to the back of your rosette. You now have a fabulous accessory!

Although this was not made for the intent of displaying a “pink” craft for this month’s Colorful Options Challenge, it certainly is a craft that screams pink.

Check out this month’s challenge for more DT inspiration!

Happy Crafting!

Sweet Lolita

Happy May, crafters, and makers! I have an exciting and different craft to share today. I designed and made a Sweet Lolita Style dress. For those that don’t know Lolita fashion, it is a Japanese street style of dressing that has an aesthetic of cuteness. Wikipedia has a good description of this style if you would like to know more. I worked without a pattern and followed the classic Lolita style. I made some of the coordinates and purchased others.

Supplies:

  • Ribbon: 1-inch white/pink lace ribbon (10 yeards), 2″white chiffon ribbon with pastel rainbow edges (12 yards).
  • Fabric: pink gingham (about 6 yards-from my stash)
  • Elastic: 2 inch (3yards)
  • Thread: white sewing thread

Time to make – 20 hours

Although this was not made with the intent of displaying a “pink” craft for this month’s Colorful Options Challenge, it certainly is a craft that screams pink.

Check out this month’s challenge for more DT inspiration!

Thanks for stopping by! Have a great month and happy creating!!

Hello Spring

Happy May, crafters! There is another challenge over at the Colorful Options Challenge this month. And as you might have guessed, the featured color this month is PINK! This is definitely an inky card, so get out your splat box and have some fun. The supplies are all listed below.

Supplies:

  • Papers: Nina 110lb White Card Stock, Pink Card Stock, Beige-Gold Card Stock, Vellum
  • Stamps: Lawn Fawn Clair’s ABCs, Tim Holt’s Ledger Script CMS241
  • Embossing Folder: From the stash, old Hobby Lobby
  • Cricut: Rectangular border
  • Inks: Distressed Oxide Ink (Kitsch Flamingo, Old Paper, Shabby Shutters, Salty Ocean, Frayed Burlap); Distress Archival Ink (Kitsch Flamingo), Versamark Embossing Ink,
  • Embossing Powder: Ranger Princess Gold
  • Distress Foundry Wax: Gilded
  • Stamping Platform: Mini Misti

Time to make – 2 days, Craft time – 3.0 hours.

Directions:

Add Kitsch Flamingo Distressed Oxide on the flat side of the embossing folder. Lightly mist the white cardstock and emboss it with an embossing folder. Color the tree and bird using a water brush and Distress Oxide Inks “smooshed” onto a working surface. Spray with water to blend into the background color. Repeat the painting and water blending as needed until happy with the result. Allow to air dry or dry with a heating tool. Use the Archival ink and Ledger script stamp to stamp randomly on the background. Blend Old Paper and Frayed Burlap together with some water and apply to the border; then, use a foam blending tool and apply Old Paper over this to blend out. Use water to help blend until happy with the result. Splatter with Foundry Wax and heat set. Create the sentiment using Lawn Fawn’s alphabet, Versamark Ink, Gold embossing powder, and some vellum. Cut out a pink rectangle using Cricut. Glue the image to the pink rectangle frame. Mount this on white fun foam and add to a second border cut about two millimeters larger than the pink rectangle. Place on the card front.

Don’t forget to visit this month’s challenge for more DT inspiration!

Stay safe and Happy Crafting!

Inspiration card: Colorful Options Challenge

Challenges entered: Double Trouble Paper Crafting Challenge #109

Mother’s Day Pink

Happy Weekend, Crafters! I have a little envelope art to share on this beautiful Saturday. A very pink creation! This was fun and fast to make. Enjoy!!

Supplies:

  • Papers: Strathmore 100lb Bristol smooth surface 11×14
  • Stamps: My Monthly Hero Arts September 2021
  • Inks: Distress Oxide Spray (Kitsch Flamingo and Spun Sugar),  Versamark Watermark Ink, Distress Spray Stain (Tarnished Brass)
  • Embossing Powder: Ranger’s White Embossing Powder
  • Acrylic Paints: Craft smart (Premium Metallic – Gold), folkArt (Colorshift Orchid Brillant, ColorShift Blue Brillant)
  • Distress Micro Glaze
  • Embellishments: Envelope seals
  • Envelope Punch Board by We R Memory Keepers

Time to make: 1 day Craft time: 1.5 hours

Directions:

Cut your paper down to envelope size (9.5inx9.5in – for a 5×7 card), score, and cut notches with the envelope board. Stamp the flowers in Versamark ink and emboss them in white powder. Make a spray using the Colorshift Orchid and water. Get out your splat box and spray with a small amount of water, Distress Oxide sprays, and the color shift spray until you are happy with the color. Heat dry or air dry. Add some blue accents with some Blue color shift acrylic thinned with water. Splatter with blue color shift and Tarnished Brass. Allow a second drying time. Flip over and paint the inside of the envelope with the gold acrylic paint. Use the excess paint on your finger to apply to the edges of the envelope until happy with the result. Allow, yet another dry time. Fold and glue.

Challenges entered: SSS Wednesday Challenge, Time Out Challenge, Make The Cards Challenge, Tic Tac Toe Challenge (Anything but a Card,Free-embossing,Mother’s Day – it is my envelope for my Mother’s Day Card)

Diamonds

“are a girl’s best friend’

Happy Hump Day, Crafters!!! I finally had some time to create. I saw a video Made by Sannie, and just had to try her techniques. OMgoodness it was tremendous fun!

Supplies:

  • Papers: Arteza Watercolor Paper, Fuschia card stock, Silver glitter card stock, white fun foam
  • Stamps: Stamping Bella’s Oddball Marilyn, Tim Holt’s Ledger Script CMS241, SSS Good Reading Background
  • Stencils: Kindred Stamps “stars” (retired)
  • Sentiment: Cricut cut
  • Inks: Distressed Oxide Ink Stampad (Kitsch Flamingo,Picked Raspberry, Victorian Velvet, Tattered Rose, Wild Honey, Scattered Stray), Archival Inks (Black Soot, Speckled Egg), Versamark Watermark, Distress Ink Spray (Speckled Egg, Hickory Smoke)
  • Embossing Powder: Emerald Creek’s Black Cherry Aroma
  • Guache: White
  • Texture Paste: Distress Matte with Distress Frosted Crystal
  • Distress Micro Glaze
  • Embellishments: “Diamonds” from the stash, White Gel Pen
  • Stamping Platform: Mini Misti

Time to make – 2 days, Craft time – 3.0 hours.

Directions:

Stamp Marilyn in Archival Ink twice and then with Versamark. Emboss with Black Cherry powder. Color using a water brush and Distress Oxide Ink “smooshed” onto a working surface. Allow to dry and place micro glaze over Marilyn. Spray with water and the Distress Ink sprays until you are happy with the color. Heat dry or air dry. Splatter with Picked Raspberry and white gouache. Add the texture paste through the stencil and allow it to air dry. Randomly stamp with Archival Speckled Egg using SSS’s Good Reading stamp. Randomly stamp with Archival Black Soot using Tim Holt’s Ledger Script CMS24. Add sentiment and jewels. Mount to white fun foam and add to the card front.

Here is a copy of the inspiration card:

Go check her video for detailed instructions on how to make a card like this!

Challenges entered: Creative Knockouts, STAMPlorations, Not 2 Shabby, 613 Avenue Create, SSS Monday Challenge, Crafting Happiness Challenge, Scrapping4Fun Challenge, As You Like It Challenge (All my products were new stash products. Although I like recycling, I like to use new in my makes☺.)

Sunflowers For a Friend

“Thank you for being a friend!”

As a warm and welcome spring gift to my BFF, I created these adorable sunflower earrings.

Supplies: Yellow and Brown – DMC embroidery thread using 3-ply, 0.4mm crochet hook, stock earring hooks.

 The flower pattern is from the book 100 Micro Crochet Motifs: Patterns and Charts for Tiny Crochet Creations by Steffi Glaves.

Craft time: 2 hours

There is another challenge over at the Colorful Options Challenge this month. And as you might have guessed, the featured color this month is YELLOW!

Please visit this month’s challenge for more inspiration!